Tuesday, February 06, 2018

Classflow - Your Cloud Based Option for Engaging & Interactive Promethean Lessons

ClassFlow has been on my "to do" list ever since Promethean released it back in 2016...I have a very long too do list!!  Recently, when my school upgraded their Promethean Boards, it was time to roll up my sleeves, dive in, and explore what Classflow is all about so I could share it with our teachers. 

The first question to answer is "What exactly is Promethean ClassFlow?" Well, according to ClassFlow's Top 10 FAQ's post from their community blog, "ClassFlow is a FREE collaborative learning software for the next generation classroom. ClassFlow is cloud-based and accessible on any device with internet access  It simplifies the way that teachers discover, create, and deliver interactive learning. It also makes it easier than ever to teach and assess students in the modern classroom. ClassFlow is especially useful when students are using devices in 1:1 environments." 

               "ClassFlow is a comprehensive instructional delivery system that increases the depth of student and teacher engagement by providing interactive and collaborative use of classroom devices, digital curriculum, and assessments for learning." http://ClassFlow.com

Before ClassFlow, some of you may remember using ActivInspire software to create your Flipchart lessons. You may also remember visiting the website Promethean Planet for lesson resources, as well as, FREE and premium lessons to download.  However, with the rise of technology integration and 1:1 initiatives, it was time for Promethean to catch up with the trends.  As a result, ClassFlow was born and combines the best of Promethean Planet and ActivInspire: ClassFlow Lesson Delivery Platform and ClassFlow Marketplace. 

With the Classflow Lesson Delivery Platform, teachers can deliver content to their student's 1:1 devices.  This content can consist of complete lessons, interactive learning activities such as matching, sorting, whiteboards, etc.), assessments, polls, and more.  


ClassFlow Dashboard 
The ability to push out learning activities in real time for the students to complete on their devices is what I would consider Promethean's biggest improvement.  When the students have finished, they can return it to you and you can choose to display their responses/answers with the class on your board.  I think the video below does a super job of demonstrating the potential of ClassFlow in our 1:1 classroom environment.  


The ClassFlow Marketplace is where you can search for FREE or premium K12 lessons or lesson content to design your own.  This includes complete lessons, assessments, 3D models, images, simulations, graphing calculator, PDFs, Word Documents, web links, videos, content bundles, just to name a few.  You can filter your search by subject, grade level, file format and more. 


Take a peek at this ClassFlow Connect video to hear what teachers are saying about using ClassFlow.  If you like what you see, subscribe to ClassFlow Connect's YouTube Channel by clicking HERE and then click the subscribe button!


Additional features of ClassFlow include the following: 

Digital Badging Award System 


Another cool feature of ClassFlow is there built-in digital badging award system. You can now recognize outstanding student behavior by sending digital badges to your students and parents! Choose from ClassFlow's gallery of badges or make your own! Learn how by clicking HERE 

ClassFlow Moments App

Promote parental involvement using the ClassFlow Moments App.  


ClassFlow Memories for increased home to school communication and involvement


GETTING STARTED


1.  Sign-up for a FREE ClassFlow account (just log in using your Google Account) 

2.  Start designing interactive lessons using resources you can find on the ClassFlow Marketplace or upload your own materials from Google Drive and DropBox.  You can also convert existing Flipcharts, SMART Notebook pages, and PowerPoints.  Or, find a lesson designed and shared by a fellow ClassFlow community member.

3.  Share lessons out to students and control from the board or your device.

4.  Share a quick learning activity or assessment out to your student's devices.  Have them return it to you to display on board for a class discussion. 

4. Students will first need to join your ClassFlow classroom using a join code or you can sync your class roster with an existing Google Classroom. 


EXAMPLE LESSONS & RESOURCES from MARKETPLACE

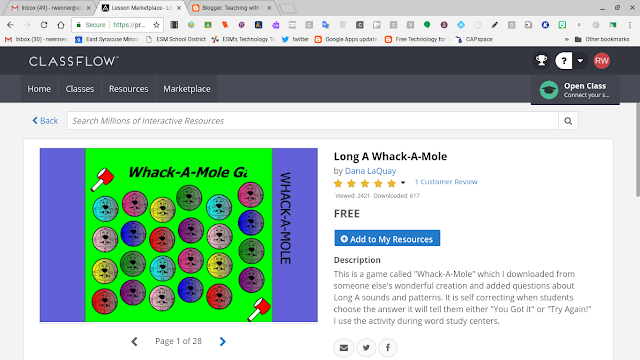
Below are just a few different resources materials I pulled from the marketplace:

3d Models


If you would like to learn more about ClassFlow, check out some of the Professional Learning sites below.  

Twitter @ClassFlow
ClassFlow Facebook Page 
ClassFlow Educators (Facebook Group)
ClassFlow Help 
ClassFlow YouTube Channel 
ClassFlow Getting Started Guide (PDF)

Friday, November 17, 2017

Pear Deck Add-On for Google Slides


Pear Deck has been on my list for awhile to feature in a blog post.  When I learned that they now had a Pear Deck Add-On for Google Slides, I knew it was time!

Pear Deck is an interactive slide deck tool similar to Nearpod where students join in on the live presentation from their own device.  Pear Deck provides a variety of interactive question options and activities for teachers to use as means to assess student's learning and keep students engaged.  

What is super cool is that Pear Deck has been working with Google and just released a Pear Deck Add-on for Google Slides.  Now you can keep designing your presentations in Google Slides but add Pear Deck's formative assessment questions right from the Google Slides editor!  When your slides are made, it's important that you present with Pear DeckIf you present with Google Slides, you will miss out on all the interactive Pear Deck magic you just created. Now that's awesome!  

Check out the resources below to start using the Pear Deck Add-on for Google Slides in your classroom! today!

1.  Click HERE to get the Pear Deck add-on from the Chrome Web Store.  

2.  Watch this introduction video: 


3.  Pear Deck for Google Slides Add-On Frequently Asked Questions

4.  Example Pear Deck Lessons 

5.  Cool Things You Can Do (Tips & Tricks) 

Monday, May 08, 2017

Teaching Channel - All Grade Levels, All Subjects, All Teachers Learning Together

A while back I discovered a great web resource for educators called the Teaching Channel. The Teaching Channel is a FREE multi-platform service delivering professional development videos for educators.   

The stated mission of the Teaching Channel is to revolutionize how teachers learn, connect, and inspire each other to improve the outcomes for all students in America. To accomplish this, the Teaching Channel has established three goals:
  • Build teacher-driven professional learning
  • Deepen and improve opportunities for teacher learning
  • Elevate and celebrate teachers in our society
What I love about the Teaching Channel, is that its not just a site to watch videos of amazing teachers. With every video, you get all the materials you would need to teach the same lesson in your classroom.  In the screen shot to the right, notice they provide the Lesson Objective, the length of the lesson, Questions to Consider, Common Core Standards, and Supporting Materials that you can download. They also provide additional videos that pertain to the same topic of the video you just watched! 

The Teaching Channel also hosts a community for educators to share ideas, best practices, and enhance their knowledge. Over 800,000 teachers from around the globe are members of this community.  

Users do not need to register to explore their video library.  However, by signing up for a FREE account you could try out any of the following three features:


  • 1 FREE LESSON PLANNER

    You can save, schedule and get reminders on great ideas you want to use in your classroom.
  • 2 NOTIFICATIONS

    Get email alerts when there are new videos that match your interests
  • 3 VIDEO NOTES

    Take time-stamped notes as you watch videos and then share them with your colleagues


Registered users can aso download supporting materials.  


Here are a few video examples that I found using the search menu.  You can also search for videos by grade level and/or topic.

Wednesday, October 05, 2016

Canva Spells Creativity!

If you can think of it, you can create it with Canva! Teachers are always asking me for a web based alternative for Microsoft Publisher. Canva is great because within one tool you can create a variety of design options that include brochures, flyers, posters, cards, social media posts, memes, presentations, infographics and so much more. Canva is easy to use and has lots of built in features that make the designing process a snap.

You can login with your Google or Facebook account, or you can create a Canva account with an email address. You then get to choose from one of the many design options, as well as, a snazzy layout. If you prefer to start from scratch, don't choose anything and start with a blank page.

The toolbar, located to the left of your project, allows you to change your layout, search from over a million images, add elements, text, backgrounds and upload your own photos. Elements are design options that include photo grids, frames, charts, shapes, lines, illustrations and icons (see image to the right).  All added content can be easily moved, resized, formatted, layered, duplicated and deleted.  Adding hyperlinks is also a feature if sharing your finished product online. 

Your finished project can be downloaded for print as a PDF or image file. It can be shared online via Twitter or Facebook, or through a link that you could add to your website or email to viewers. If you need some design inspiration, you can view what other Canva users have created.  Click HERE to get a glimpse of the gallery.   

I have used Canva for a variety of projects that  included brochures, invitations, and posters. For a free tool, I was impressed with the professional look I was able to achieve without a huge learning curve. Students who have used it, picked it up with ease and enjoyed designing infographics, posters, and presentations as a way to demonstrate their knowledge while being creative at the same time.  If you have questions, you can easily search for a particular topic using their "Need Help?" feature.  YouTube has a nice selection of Canva tutorials.  Below is a good one from TeachersTech:


Poster created for Hat Day Fundraiser!


Interactive Food Research Posters for #FACS


Friday, June 10, 2016

Hype Up your Teaching with Hyperdocs

Recently I have been learning about a cool teaching tool called a "hyperdoc".  When I first heard about hyperdocs I thought to myself; "Whoopdy do!  It is a document with hyperlinks."  I also questioned how this was different than an interactive student learning menu which I wrote about in a previous post. However, after further investigation I realized if designed correctly, a hyperdoc provides the platform for a multi-layered digital lesson that really engages and inspires students.

A hyperdoc in simplest terms is a "hyper" google doc linked to all sorts of online teaching and learning materials needed for students to complete a unit of study.  A true hyperdoc provides inquiry learning opportunities to discover new information. These can be in the form of questions with links to videos, presentations, images, cartoons, info-graphics, and interactive web tools such as Ed-Puzzle and Quizlet.  Hyperdocs also include tasks for the students to design or make something as means to apply their new knowledge.  This could include a web site, Hyper "Google" maps, movies, presentations, 3D models and so on.  Hyperdocs are a great tool to differentiate instruction and can be used at any grade level and are cross curricular.  

Below are links to example Hyperdocs that you could use.  Make a copy of the doc if you want to tweak it to fit your personnel needs.  This does not even begin to scrape the surface of examples and templates you can find on line.  

Coordinate Geometry 
Oregon Trail
World History:  Why Where Japanese Americans Interned During WWII
Solving Equations Hyperdoc (Algebra) 
Love and Hate (Romeo & Juliet)
Adaptation Hyperdoc Lesson
Hyperdocs & Templates (Google Drive Folder chocked fool of examples and templates)!!

Hyperdocs were co-created by three inspiring educators named Lisa Highfil, Kelly Hilton and Sarah Landis.  If you don't already follow them on Twitter you should. They also have created a Twitter account named "Teachers Give Teachers
" @TsGiTs where Teachers can share hyperdocs that they have created. Why recreate the wheel? Start here first to get your feet wet. 

You may also want to join in on one of their Hyperdoc Hangouts On Air (Google Hangout Sessions) that take place every Tuesday on Twitter. However, if that is not your thing, all episodes are archived here on YouTube.  These videos will show you how to effectively create hyperdocs so they are not just a substitution for the old worksheet method of instruction. They can easily be made using Google Docs, Slides, or Sites.  


"WARNING - Hyperdocs without creativity can turn into simple technology substitutions for old school worksheets"


(Image from:  http://karlymoura.blogspot.com/2016/04/hyperdocs-need-i-say-more.html)

To learn more about Hyperdocs check out Lisa Highfil's Google Sites page: Hyperdocs - Changing Digital Pedagogy  While you are there, don't miss the Hyperdoc tour!  


Friday, April 08, 2016

Give Students a Voice in Their Learning: Student Learning Menus

Student Learning Menus, also known as Student Choice Boards, are great instructional tools to support differentiated instruction and give students a voice in their own learning.  A Learning Menu, in simplest terms, is a document or website outlining a variety of learning activities that focus on a specific learning goal. The menu should include both traditional and technology driven menu choices. You may also hear Learning Menus called Tic Tac Toe Choice Boards (see links below).  Just like menus in a restaurant, more complex Learning Menus are often designed with different sections:  Appetizers, Main Courses, and Desserts.  Each section would have different "learning choices".  Generally, one section of the menu has to be completed before moving on to the next menu section. 


The teacher's role is to facilitate the menu process. This would include providing their expectations for each activity, rubrics, parameters, imperatives and non-negotiables.  Students are given full control over his/her choice from each menu section.  Before moving on to the next section of the menu, a teacher would need to grade the completed menu choice.  Some teachers have students "quiz out" of that menu section, demonstrating mastery, before moving on to the next "entree"!

Learning Menus can be easily made using Google Docs, Google Slides, or Google Sites and can be shared with your students through Google Classroom.  Menus can be made interactive by including links to needed web tools, rubrics, Google templates, examples, videos, and more. You can easily search the web and find lots of already created menus that you could download and use as is or tweak to fit your needs. 

Take five minutes to watch this great video from the Teacher Channel entitled; "Differentiating with Learning Menus".  Hear from Mary Vagenes who teaches 7th Grade US History at Queen's School of Inquiry.  Mary does a nice job explaining what a Learning Menu is and why she uses them in her classroom.  Hear from Mary's students as to why they like Learning Menus.


The GAFE Learning Menu for Teachers is an example Learning Menu that I made using Google Docs. I designed this one more like a Tic Tac Toe board.  Teachers would complete each activity to earn a digital badge for professional development.

Below are links to example Learning Menus/Choice Boards that can be downloaded:

Friday, February 12, 2016

Kids go Krazy for Kahoot

Kahoot is a game based learning  platform that you and your students are going to love. WARNING!!  After using it once in your classroom your kids will be hooked and Kahoot Classroom Marathons will be the only review tool they want to use!  

Here is how it works in three easy steps.  First you need to set up your free account (you currently cannot sign-in with Google)  Next, design your learning game called a "Kahoot". Then, have your kids join the kahoot by entering the specific join code at https://kahoot.it/#/ . Launch the game and watch your students learn and fun at the same time!! So simple to use and really engaging for your students.  If you need some inspiration, take a peek at the public Kahoots for some ideas or find one that fits your needs and feel free to use it!

Play the intro Kahoot by clicking here to see how it works from the student´s perspective (click the launch button to start the game).  

Learn how to make you own Kahoot by watching this video tutorial:


What you else might you want to check out? 

Friday, December 04, 2015

Creating Interactive Video Lessons with EdPuzzle

EdPuzzle is a tool that makes it a breeze for teachers to take a video and turn it into a whole interactive lesson. Video lessons are ideal for Flipped Classrooms, for the student that needs additional support, classroom learning stations, or an in class activity posted to your Google Classroom for students to complete when a teacher is absent.  

The process is simple. Teachers can create their video lessons either using their own video material or videos accessible within EdPuzzle from sites such as YouTube,TedEd, Khan Academy, National Geographic, and LearnZillion to name just a few. The easy to use cropping tools make it a snap to crop just the part you need.  These small clips can then be combined to make one continual video. 
Now is the fun part; adding the iinteractive features. Audio Notes, Audio Tracks, and Quizzes can be added to transform the simple task of watching a video into a much more engaging and powerful learning activity for the student (see EdPuzzle's Blog for a complete description of each interactive function).  When the lesson is finished teachers can assign the lesson directly to Google Classroom from within EdPuzzle.

The mechanics of EdPuzzle are super user friendly and very similar to Google Classroom in which Teachers create a class with a specific class code. Students join the class using the code to access the video lesson.  Students do not need an email address and can login with there Google accounts (or set up their own within seconds). Through these classrooms teachers can view student's responses to the questions and generate a progress report that can be downloaded as a PDF or printed.  

Check out some of the example video lessons below.  


If you like EdPuzzle, you may also like:

VideoNot.es
Zaption
Educannon

Friday, October 10, 2014

Teach with TedEd's Lessons Worth Sharing Platform

We have all seen at least one of the amazing "TED Talk" videos at one point or another.  After watching a great video on how our body language effects people's perception of us, I started exploring all the other features of the TED website.  One tool that I found to be totally awesome for all educators but more importantly all students,  is their  TEDEd - Lessons Worth Sharing generator. 

What is it?

TedEd.com is a free educational web tool for both teachers and learners.  Within their ever growing TedEd video library, you fill find carefully curated educational videos.  Users of TedEd can build and customize meaningful lessons around any video (not just TED videos) that can be shared publicly or privately.  Students then WATCH, DIG DEEPER, DISCUSS aka Communicate, Collaborate, and Critically Think!!  Create your own lesson or use one of the amazing lessons created by educators and brought to life by talented animators from around the globe!!

Check out a few example lessons so you get the idea: (A little something for Everyone)

How Do we Measure Distance in Space?

What you might not know about the Declaration of Independence 

World War II:  Why is it so important 70 Years Later?

How Playing and Instrument Benefits your Brain

The Survival of the Sea Turtle

The Simple Story of Photosynthesis and Food


How to Get Started

So here's how it works.  The first thing to do is set up your free account.  You will need to confirm your account, so don't forget to login to the email you provided and wait for the confirmation email TEDEd will send you.  Once you have an account, login and click the "Create a Lesson" link at the top.  


You will then search for a video you want to create your lesson around.  For my example, I searched "Hong Kong's Umbrella Revolution".  You are then given a list of videos to choose from which can all be previewed before making your final selection. 


Click the "Launch Lesson Editor" button after choosing your video. 


You should now see the lesson creator page with the video that you selected. Use this form to add a title and an introductory text.  Use the "Think," "Dig Deeper," "Discuss," and "...And Finally" sections to add any questions, information, or discussion topics that you want. If you don’t need any of these sections, either manually exclude them, or simply leave them blank. Once your customizations are complete, click the Publish button. Your lesson is now ready to be shared!


How to Share Your Lessons

To share your lesson with students, simply share the URL for the lesson page.  Any student who is logged in to TED-Ed will automatically be added to your lesson when they begin answering questions or participating in discussions. As students fill in answers, these answers will be automatically available to you through the You page.

While you can share the URL for your TED-Ed lesson in whatever way works best for you, TED-Ed offers you a few tools for easily sharing this information. To view these options, go to the You page and find the red gear icon under the video thumbnail for the lesson you want to share. In the popup that opens when you click this icon, you can either email your lesson link to a list of students or post your lesson link on social media.


Here's the lesson I made for this blog post:  http://ed.ted.com/on/q0Br6VU1


FYI:  

Two Types of TED-Ed Lessons  

"There are two types of TED-Ed lessons. The first, TED-Ed’s award-winning original lessons, represent collaborations between expert educators, screenwriters and animators. Each collaboration aims to capture and amplify a great lesson ideas suggested by the TED community. The second type of TED-Ed lesson can be created by any website visitor, and involves adding questions, discussion topics and other supplementary materials to any educational video on YouTube. Both types of TED-Ed lessons are used regularly -- in classrooms and homes -- to introduce new topics to learners in an exciting, curiosity-inspiring ways."  http://ed.ted.com/about


Monday, May 19, 2014

Flip over FlipQuiz!


Reviewing for exams is a necessary task.  If the method or strategy being used for the task is a "one way street" from teacher  to students, it can be very boring and unproductive.  Trying to make it engaging and fun for students is not always an easy assignment for any educator. PowerPoint Jeopardy style games are effective, but can be very tedious and time consuming to create (even when using a template).  Plus, to today's students, being the digital natives that they are, PowerPoint can appear dull and out-dated.  

FlipQuiz is a fairly new web tool that provides teachers a quick and easy way to create game show-style boards for test reviews in the classroom.  FlipQuiz has a slicker appearance than PowerPoint that should keep the attention of even your most toughest customer .  Because FlipQuiz is web-based, it can be accessed anywhere allowing students to review on their own time frame with any Internet accessible device.  Or, switch it around a bit, and have your students create the review quizzes.  Put them into groups and assign each group a different unit.  Then, each group will prepare a unit specific review game that will be shared for everyone. 

Once you set up your account and log in, you may want to first look under thSearch and; Discover area of the website at games that have been shared by other users. If you are lucky, you will find one that suits your needs and is ready to use.  However, creating your own quiz is so simple.  If you already have your questions and answers, all it takes is typing them in.   No more need to make hyperlinks and 100 different slides! 


Here are links to a few different quizzes.  Check them out!

American History                 Geometry             Bio 2 Semester Test           

Animal Life Cycles              Grade 2 Library Review            Parts of Speech


Creating Your Own Quiz Boards


1.  Get started by setting up your free account at: http://flipquiz.me/  

2.  Log-in

3.  Click the "New Board" button at the top.  


3.  This is the screen where you will add a title to your quiz, categories, questions and answers.  You can have up to 6 categories per game board.   You can include links to videos, webpages, and images as part of your questions and answers.  


4. At  the bottom of the same screen there is an option for you to upload an image that becomes the cover of your quiz-board (optional). 

5. When you are finished, hit the SAVE button.   

6.  Your quizzes will all be saved under My Boards and listed under the Search and Discover area to be shared with the world!!

7.  You can easily find all your quiz-boards by clicking on the My Boards button at the top after you log in to your account. 


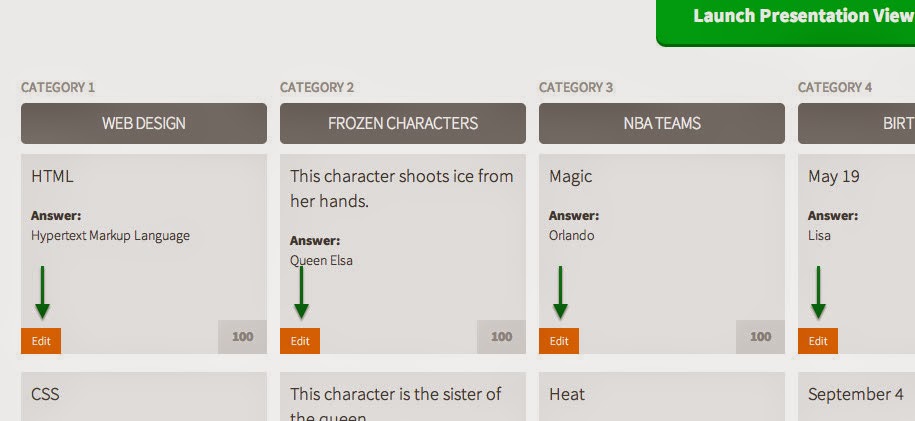
8. Editing a quiz-board is just as easy.  Once you have selected the board from My Boards, just click on the orange Edit Your Entire Board button.  


Once the screen (displayed to the right) opens, find the question(s) you need to edit, and then click on that question's orange Edit button.  


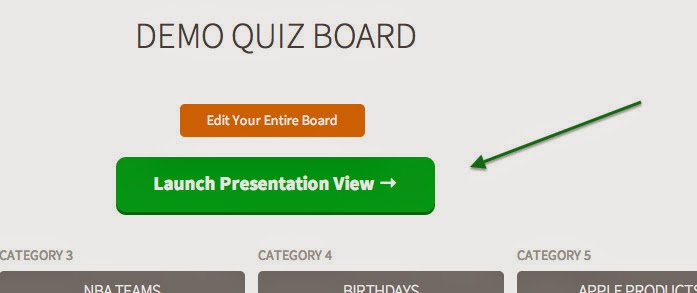
9.  To launch your quiz into presentation mode, click on the green Launch Presentation View.  


That's it!!  Happy reviewing!!