Friday, December 04, 2015

Creating Interactive Video Lessons with EdPuzzle

EdPuzzle is a tool that makes it a breeze for teachers to take a video and turn it into a whole interactive lesson. Video lessons are ideal for Flipped Classrooms, for the student that needs additional support, classroom learning stations, or an in class activity posted to your Google Classroom for students to complete when a teacher is absent.  

The process is simple. Teachers can create their video lessons either using their own video material or videos accessible within EdPuzzle from sites such as YouTube,TedEd, Khan Academy, National Geographic, and LearnZillion to name just a few. The easy to use cropping tools make it a snap to crop just the part you need.  These small clips can then be combined to make one continual video. 
Now is the fun part; adding the iinteractive features. Audio Notes, Audio Tracks, and Quizzes can be added to transform the simple task of watching a video into a much more engaging and powerful learning activity for the student (see EdPuzzle's Blog for a complete description of each interactive function).  When the lesson is finished teachers can assign the lesson directly to Google Classroom from within EdPuzzle.

The mechanics of EdPuzzle are super user friendly and very similar to Google Classroom in which Teachers create a class with a specific class code. Students join the class using the code to access the video lesson.  Students do not need an email address and can login with there Google accounts (or set up their own within seconds). Through these classrooms teachers can view student's responses to the questions and generate a progress report that can be downloaded as a PDF or printed.  

Check out some of the example video lessons below.  


If you like EdPuzzle, you may also like:

VideoNot.es
Zaption
Educannon

Friday, October 10, 2014

Teach with TedEd's Lessons Worth Sharing Platform

We have all seen at least one of the amazing "TED Talk" videos at one point or another.  After watching a great video on how our body language effects people's perception of us, I started exploring all the other features of the TED website.  One tool that I found to be totally awesome for all educators but more importantly all students,  is their  TEDEd - Lessons Worth Sharing generator. 

What is it?

TedEd.com is a free educational web tool for both teachers and learners.  Within their ever growing TedEd video library, you fill find carefully curated educational videos.  Users of TedEd can build and customize meaningful lessons around any video (not just TED videos) that can be shared publicly or privately.  Students then WATCH, DIG DEEPER, DISCUSS aka Communicate, Collaborate, and Critically Think!!  Create your own lesson or use one of the amazing lessons created by educators and brought to life by talented animators from around the globe!!

Check out a few example lessons so you get the idea: (A little something for Everyone)

How Do we Measure Distance in Space?

What you might not know about the Declaration of Independence 

World War II:  Why is it so important 70 Years Later?

How Playing and Instrument Benefits your Brain

The Survival of the Sea Turtle

The Simple Story of Photosynthesis and Food


How to Get Started

So here's how it works.  The first thing to do is set up your free account.  You will need to confirm your account, so don't forget to login to the email you provided and wait for the confirmation email TEDEd will send you.  Once you have an account, login and click the "Create a Lesson" link at the top.  


You will then search for a video you want to create your lesson around.  For my example, I searched "Hong Kong's Umbrella Revolution".  You are then given a list of videos to choose from which can all be previewed before making your final selection. 


Click the "Launch Lesson Editor" button after choosing your video. 


You should now see the lesson creator page with the video that you selected. Use this form to add a title and an introductory text.  Use the "Think," "Dig Deeper," "Discuss," and "...And Finally" sections to add any questions, information, or discussion topics that you want. If you don’t need any of these sections, either manually exclude them, or simply leave them blank. Once your customizations are complete, click the Publish button. Your lesson is now ready to be shared!


How to Share Your Lessons

To share your lesson with students, simply share the URL for the lesson page.  Any student who is logged in to TED-Ed will automatically be added to your lesson when they begin answering questions or participating in discussions. As students fill in answers, these answers will be automatically available to you through the You page.

While you can share the URL for your TED-Ed lesson in whatever way works best for you, TED-Ed offers you a few tools for easily sharing this information. To view these options, go to the You page and find the red gear icon under the video thumbnail for the lesson you want to share. In the popup that opens when you click this icon, you can either email your lesson link to a list of students or post your lesson link on social media.


Here's the lesson I made for this blog post:  http://ed.ted.com/on/q0Br6VU1


FYI:  

Two Types of TED-Ed Lessons  

"There are two types of TED-Ed lessons. The first, TED-Ed’s award-winning original lessons, represent collaborations between expert educators, screenwriters and animators. Each collaboration aims to capture and amplify a great lesson ideas suggested by the TED community. The second type of TED-Ed lesson can be created by any website visitor, and involves adding questions, discussion topics and other supplementary materials to any educational video on YouTube. Both types of TED-Ed lessons are used regularly -- in classrooms and homes -- to introduce new topics to learners in an exciting, curiosity-inspiring ways."  http://ed.ted.com/about


Monday, May 19, 2014

Flip over FlipQuiz!


Reviewing for exams is a necessary task.  If the method or strategy being used for the task is a "one way street" from teacher  to students, it can be very boring and unproductive.  Trying to make it engaging and fun for students is not always an easy assignment for any educator. PowerPoint Jeopardy style games are effective, but can be very tedious and time consuming to create (even when using a template).  Plus, to today's students, being the digital natives that they are, PowerPoint can appear dull and out-dated.  

FlipQuiz is a fairly new web tool that provides teachers a quick and easy way to create game show-style boards for test reviews in the classroom.  FlipQuiz has a slicker appearance than PowerPoint that should keep the attention of even your most toughest customer .  Because FlipQuiz is web-based, it can be accessed anywhere allowing students to review on their own time frame with any Internet accessible device.  Or, switch it around a bit, and have your students create the review quizzes.  Put them into groups and assign each group a different unit.  Then, each group will prepare a unit specific review game that will be shared for everyone. 

Once you set up your account and log in, you may want to first look under thSearch and; Discover area of the website at games that have been shared by other users. If you are lucky, you will find one that suits your needs and is ready to use.  However, creating your own quiz is so simple.  If you already have your questions and answers, all it takes is typing them in.   No more need to make hyperlinks and 100 different slides! 


Here are links to a few different quizzes.  Check them out!

American History                 Geometry             Bio 2 Semester Test           

Animal Life Cycles              Grade 2 Library Review            Parts of Speech


Creating Your Own Quiz Boards


1.  Get started by setting up your free account at: http://flipquiz.me/  

2.  Log-in

3.  Click the "New Board" button at the top.  


3.  This is the screen where you will add a title to your quiz, categories, questions and answers.  You can have up to 6 categories per game board.   You can include links to videos, webpages, and images as part of your questions and answers.  


4. At  the bottom of the same screen there is an option for you to upload an image that becomes the cover of your quiz-board (optional). 

5. When you are finished, hit the SAVE button.   

6.  Your quizzes will all be saved under My Boards and listed under the Search and Discover area to be shared with the world!!

7.  You can easily find all your quiz-boards by clicking on the My Boards button at the top after you log in to your account. 


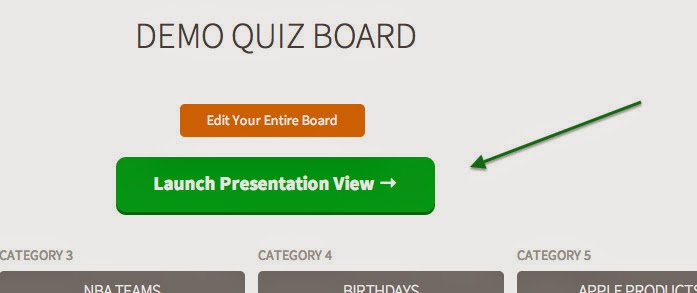
8. Editing a quiz-board is just as easy.  Once you have selected the board from My Boards, just click on the orange Edit Your Entire Board button.  


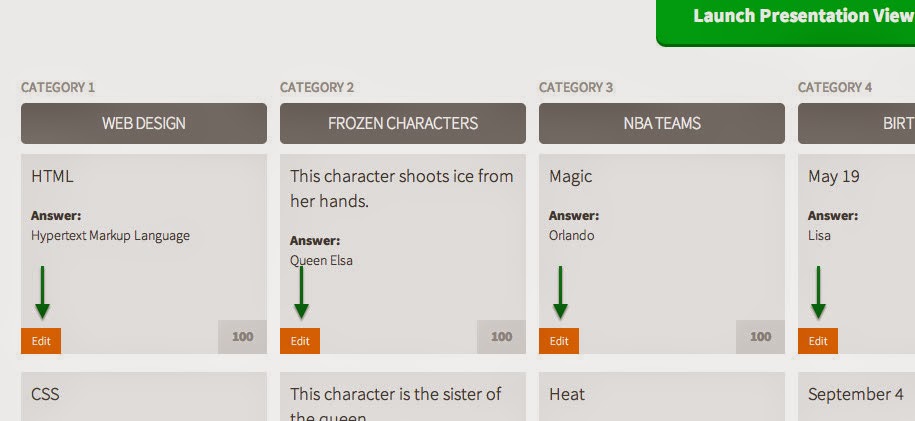
Once the screen (displayed to the right) opens, find the question(s) you need to edit, and then click on that question's orange Edit button.  


9.  To launch your quiz into presentation mode, click on the green Launch Presentation View.  


That's it!!  Happy reviewing!!

Friday, December 13, 2013

Inform with Infographics


Are you familiar with infographics?  An infographic is a visual representation of data, knowledge, and information. They are intended to provide the viewer a complex thought or idea in a quick and concise manner.  Infographics generally include images, charts, timelines, text and numbers.  The text is generally in the form of a metaphor to help get the point across to the viewer.  In the past, they have been commonly used by businesses, scientists, engineers or anyone that wanted to present a "heavy"  concept clearly.  However, now with free, easy to use, online tools, anyone can make them.  The above infographic was created by a student for a project in health.  If you need more examples of student created infographics for inspiration, check out this teachers blog and gallery of student created infographics.?  

OK, so how can we use infographics in the classroom?  Chris Clark, writer of the NspireD blog, states that, "It’s not hard to see the potential value of infographics in teaching and learning. Visually appealing designs can draw learners in quickly, and a well-conceived metaphor can turn an intellectual chore into a game-like experience. Memorable infographics can also provide visual learners a solid mental framework within which to store new ideas. What’s not to like?" I also see them being a great tool for students to use to present their understanding of a specific topic.  

Below are examples of how infographics can be used in the elementary classroom from the Inside the Classroom, Outside the Box" blog.  Any of these examples could easily be adapted to secondary classrooms:
  • Science: If a student is studying the Great Garbage Patch during their ecosystem unit they can inform the class about it through an info graphic. For example how much trash there is and how many animals it has hurt.
  • Math: Students can do any topic they want because infographics are all about math data and graphs.
  • Literacy: Students can compare and contrast any two books. The students can also chose a hot topic they are writing about, For example, if schools should be year round or if schools should have uniforms or not.
  • Social Studies: Students can create an infographic on any time period such as the Civil War by making a timeline infographic.
  • P.E.: Students can make an infographic on nutrition or benefits of exercise and how it correlates with grades.
Infographics are also a great way for students to use the 4c's - superskills for 21st Century Learning:
  • Collaboration: If students are working together on making these infographics they are collaborating ideas.
  • Critical Thinking: Students are critical thinking about what information should go in the infographic and why.
  • Communication: Students are communicating with each other and also communicating information.
  • Creativity: Students are designing an inforgraphic  product using the best information to present their knowledge in a clear and concise manner. 
Infographic as Creative Assessment:


Interested?  Here a few different online sites you could use:

Piktochart:  Transforms your information into memorable presentations
Infogr.am:  Create interactive Infographics
easel.ly:  Create and share visual ideas online
Many Eyes:  Lets you upload data and visualize information

...and you must check out all the resources on Kathy Shrocks Guide to Everything: Infographics page!!

Tips:
  • Keep it simple and pleasing to the eye.
  • Decide on a color scheme
  • Reference your facts in the infographic (Sources)
  • Look at others to gain ideas how you want yours set up.
  • Make them interactive by adding QR codes linked to videos

Monday, November 18, 2013

Power Presentations using POWTOONS!!


PowToon is a free website that allows users to create dynamic animated presentations and movies.  This is a great option for students looking for something snazzier than PowerPoint and less frustrating than Prezi.  Jennifer Kirchoff, a high school ELA teacher turned me on to PowToon while her class was using it to create book movie trailers.  The kids really enjoyed using the site not only because it was easy, but because it was fun and something different!

The interface is very easy to use.  However,  if you or your students get stuck and need some assistance, the site comes with its' own set of video tutorials.  Keep in mind that the free version does limit your presentations to 5 minutes. If you are interested upgrading to the premium account, it will cost you $19.00 a month.  

Lets take a closer look at the process.  After creating your account and logging in, the first step is to choose a category depending on what type of presentation you want to make .  Your options include a Blank Project, Promotional Videos, Slide show, Educational Clip, Infographic Videos and Social Clip.  I have only worked with the Blank Presentation which is just plain white slides that you design (no template).  


After giving my presentation a title it brought me to the main interface where I could add backgrounds, images, text, animated or still characters, props, music, and additional slides. 


Powtoon has it's own gallery of back grounds and images.  The image gallery is sourced by Flicker (not one of my favorites), but you can also upload your own images and backgrounds. The site also provides a small selection off free tunes  or you can upload your own. The timing of objects entering and leaving a slide can also be adjusted along with the length of time the slide is visible before going on to the next.   Your finished product can be shared with many on YouTube, or you can download it to your own computer.   

Here is a great PowToon about using PowToon in the classroom.  Fast forward through the intro if you want to just jump to the section on meeting the Common Core Standards.  


Need some inspiration?  
Students can use PowToon to share their ideas or to “prototype” an idea.  Students can create videos to show math processes, explanations of complex concepts, review new learning, teach others, explain processes, tell stories, or present research.  The possibilities are really endless and students will come up with hundreds of other creative uses. 

Check out the links below.  Remember, this tool is not just for the kids.  It's a great way to create engaging means to present new information that hooks your audience. Allow your students the ability to review the presentation over and over again by sharing online. Remember, you can share on YouTube or download to your own computer so you can add it to your own website, blog, or wiki.

Middle School:  Endangered Species

Teacher Created:  Vocabulary Lesson 

Making Nouns Plural (Spanish)

Elementary Student Book Report


Lastly...

"Teacher Elizabeth Frank: ”I decided to create a PowToon to introduce this Project Based Learning assignment because I was bored with just giving the students a “letter” or “email” from the company as an entry event. I thought a PowToon would really get the point across and get the students excited about the project they were starting. Most of my classes responded with clapping and a “That was awesome!”. To say the least they were really impressed! I have had several groups ask if they could use PowToon for the presentation aspect of this project."

Tuesday, May 28, 2013

Goodbye PowerPoint....Hello Biteslide!!


Can you Say the 4 Cs!!


...plus self-expression, imagination 
and just plain old fun!

Web-based presentation tools are a great alternative to doing a PowerPoint presentation.   In addition to traditional presentation concepts, you can have students use these tools to create web-based scrapbooks, portfolios, digital storybooks, mood boards, info graphics, posters, thought collages...you get the idea.   There are many free, online tools you could use, but I am going to feature "Biteslide" as it was designed for educators and received the 2013 Ed-Tech Digest Award. 

The key features of Biteslide include:  
  • Add images and videos directly from Google and YouTube 
  • Upload your own images and videos
  • Add text 
  • Add snazzy backgrounds, image frames, and stickers from the Extra Menu. 
  • Free to use (teacher can create a class of 30 students for free or have students create their own account)
  • Presentations can be embedded, email, downloaded, and printed
Reasons to try BiteSlide:
  • Students Develop 21st Century Skills
  • Aligns with Common Core ELA Standards
  • Great for grades 2-12
  • Site makes research fun
  • Incredibly easy to use 
  • Perfect presentations
  • Manage student projects easily
In the Classroom (borrowed from TeachersFirst.com):

"Use Biteslide to create a digital scrapbook page for any classroom activities. Print and display student work on classroom bulletin boards. Demonstrate how to add pictures, videos, and change backgrounds before allowing students to work on their own. Assign students to create a Biteslide collage instead of creating a drawing or other form of media. Be sure to provide rubrics for content to be included. Art teachers can assign students to collect images using the same design elements or build portfolios of favorite images. Teach ethical use of online images, etc. by demonstrating and requiring citations. Have student groups create scrapbooks about a decade, a famous person, or a science concept -- even a leaf "collection. Have students collect favorite poems and add images into a Favorite poems scrapbook (including their own, of course). Maybe make a class literary magazine!"
Here is an example Biteslide (scrapbook) that I made on the Life of Barack Obama. Enjoy!

 Check out the 2013 Favorite Historical Figures contest submissions on Pinterest!!   
Here are a few other web-based presentation tools you might like:
Empressr
Prezi
PreZentit
visual.ly 


Monday, March 18, 2013

Inspired by Pictures

Do you have struggling writers?  Is it hard for them to come up with their own ideas of what to write about?  Or maybe, they just can't seem to find the right words? Or, do they lack the ability to put their words in a structure that creates sentences that hooks the reader?  Show them PicLits and see what happens!!  

PicLits was created to get learners inspired to creatively write through pictures and words.  It is great to use to write a caption, a sentence, a poem, or a short paragraph.  PicLits  offers a fun way to learn new vocabulary and play with word forms and sentence structure.  It has been featured as one of the top free web tools on many educational blog and news sites.  Don't believe me?   Take a look for yourself:  ttp://www.piclits.com/News.aspx

Students start by choosing a picture from a
 L-A-R-G-E gallery. They can then decide if they want to design their writing piece by dragging and dropping words from the provided word bank, or they can choose to "free-hand" it which allows them to type their sentences or paragraphs.   Students can then choose to either save/download their PicLits to print, or they can can be shared via email, or on a blog, wiki, etc.    

Another feature of PicLit that I found very helpful was their Learn It sections.  It provides short and easy to read descriptions of writing:   Write-it and Rhyme it.  It is also here under the LearnIt pages where teachers can find  advanced lessons on teaching kids to read and write poetry..  Look under the Master-it section!!


PicLit from PicLits.com

A few classroom application ideas:
  • Use to define vocabulary words and/or literary terms
  • Introduce poetry and creative writing
  • Teacher led journal writings or blog posts
  • Conceptualize a problem and practice math skills.
  • Character traits
  • Public Service Announcement Posters
  • Backdrops for poems
  • Descriptive writing (one sentence or short paragraph about image)
  • Individual or partner writing
  • Compare and contrast (using two different images)
  • Create math sentence around pictures ( https://sites.google.com/site/361techcheck/math-piclits)
  • Visual and vocabulary support for ESL students
A few visuals...


21st Century Skills:
  • Think creatively 
  • Communicate clearly
  • Apply technology effectively 
  • Create media products 

Common Core State Standards (CCSS

Mathematics - Use PicLits real-world images to help conceptualize a problem and practice math skills.

  • K.CC Count and Cardinality - Understand the relationship between numbers and quantities; connect counting to cardinality
  • K.G Geometry - Identify and describe shapes (squares, circles, triangles, rectangles, hexagons, cubes, cones, cylinders, and spheres).
  • 6.G Geometry - Solve real-world and mathematical problems involving area, surface area, and volume.


English Language Arts - Use PicLits real-world images to inspire and motivate students in developing ELA skills.

Writing Standards:
  •  W.K.6 With guidance and support from adults, explore a variety of digital tools to produce and publish writing, including in collaboration with peers.
  • W.8.6 Use technology, including the Internet, to produce and publish writing and present the relationships between information and ideas efficiently as well as to interact and collaborate with others.
Language Standards:
  • L.K.5 Demonstrate understanding of word relationships and nuances in word meanings.
  • L.8.5 Demonstrate understanding of figurative language,word relationships, and nuances in word meanings.