Friday, October 10, 2014

Teach with TedEd's Lessons Worth Sharing Platform

We have all seen at least one of the amazing "TED Talk" videos at one point or another.  After watching a great video on how our body language effects people's perception of us, I started exploring all the other features of the TED website.  One tool that I found to be totally awesome for all educators but more importantly all students,  is their  TEDEd - Lessons Worth Sharing generator. 

What is it?

TedEd.com is a free educational web tool for both teachers and learners.  Within their ever growing TedEd video library, you fill find carefully curated educational videos.  Users of TedEd can build and customize meaningful lessons around any video (not just TED videos) that can be shared publicly or privately.  Students then WATCH, DIG DEEPER, DISCUSS aka Communicate, Collaborate, and Critically Think!!  Create your own lesson or use one of the amazing lessons created by educators and brought to life by talented animators from around the globe!!

Check out a few example lessons so you get the idea: (A little something for Everyone)

How Do we Measure Distance in Space?

What you might not know about the Declaration of Independence 

World War II:  Why is it so important 70 Years Later?

How Playing and Instrument Benefits your Brain

The Survival of the Sea Turtle

The Simple Story of Photosynthesis and Food


How to Get Started

So here's how it works.  The first thing to do is set up your free account.  You will need to confirm your account, so don't forget to login to the email you provided and wait for the confirmation email TEDEd will send you.  Once you have an account, login and click the "Create a Lesson" link at the top.  


You will then search for a video you want to create your lesson around.  For my example, I searched "Hong Kong's Umbrella Revolution".  You are then given a list of videos to choose from which can all be previewed before making your final selection. 


Click the "Launch Lesson Editor" button after choosing your video. 


You should now see the lesson creator page with the video that you selected. Use this form to add a title and an introductory text.  Use the "Think," "Dig Deeper," "Discuss," and "...And Finally" sections to add any questions, information, or discussion topics that you want. If you don’t need any of these sections, either manually exclude them, or simply leave them blank. Once your customizations are complete, click the Publish button. Your lesson is now ready to be shared!


How to Share Your Lessons

To share your lesson with students, simply share the URL for the lesson page.  Any student who is logged in to TED-Ed will automatically be added to your lesson when they begin answering questions or participating in discussions. As students fill in answers, these answers will be automatically available to you through the You page.

While you can share the URL for your TED-Ed lesson in whatever way works best for you, TED-Ed offers you a few tools for easily sharing this information. To view these options, go to the You page and find the red gear icon under the video thumbnail for the lesson you want to share. In the popup that opens when you click this icon, you can either email your lesson link to a list of students or post your lesson link on social media.


Here's the lesson I made for this blog post:  http://ed.ted.com/on/q0Br6VU1


FYI:  

Two Types of TED-Ed Lessons  

"There are two types of TED-Ed lessons. The first, TED-Ed’s award-winning original lessons, represent collaborations between expert educators, screenwriters and animators. Each collaboration aims to capture and amplify a great lesson ideas suggested by the TED community. The second type of TED-Ed lesson can be created by any website visitor, and involves adding questions, discussion topics and other supplementary materials to any educational video on YouTube. Both types of TED-Ed lessons are used regularly -- in classrooms and homes -- to introduce new topics to learners in an exciting, curiosity-inspiring ways."  http://ed.ted.com/about


Monday, May 19, 2014

Flip over FlipQuiz!


Reviewing for exams is a necessary task.  If the method or strategy being used for the task is a "one way street" from teacher  to students, it can be very boring and unproductive.  Trying to make it engaging and fun for students is not always an easy assignment for any educator. PowerPoint Jeopardy style games are effective, but can be very tedious and time consuming to create (even when using a template).  Plus, to today's students, being the digital natives that they are, PowerPoint can appear dull and out-dated.  

FlipQuiz is a fairly new web tool that provides teachers a quick and easy way to create game show-style boards for test reviews in the classroom.  FlipQuiz has a slicker appearance than PowerPoint that should keep the attention of even your most toughest customer .  Because FlipQuiz is web-based, it can be accessed anywhere allowing students to review on their own time frame with any Internet accessible device.  Or, switch it around a bit, and have your students create the review quizzes.  Put them into groups and assign each group a different unit.  Then, each group will prepare a unit specific review game that will be shared for everyone. 

Once you set up your account and log in, you may want to first look under thSearch and; Discover area of the website at games that have been shared by other users. If you are lucky, you will find one that suits your needs and is ready to use.  However, creating your own quiz is so simple.  If you already have your questions and answers, all it takes is typing them in.   No more need to make hyperlinks and 100 different slides! 


Here are links to a few different quizzes.  Check them out!

American History                 Geometry             Bio 2 Semester Test           

Animal Life Cycles              Grade 2 Library Review            Parts of Speech


Creating Your Own Quiz Boards


1.  Get started by setting up your free account at: http://flipquiz.me/  

2.  Log-in

3.  Click the "New Board" button at the top.  


3.  This is the screen where you will add a title to your quiz, categories, questions and answers.  You can have up to 6 categories per game board.   You can include links to videos, webpages, and images as part of your questions and answers.  


4. At  the bottom of the same screen there is an option for you to upload an image that becomes the cover of your quiz-board (optional). 

5. When you are finished, hit the SAVE button.   

6.  Your quizzes will all be saved under My Boards and listed under the Search and Discover area to be shared with the world!!

7.  You can easily find all your quiz-boards by clicking on the My Boards button at the top after you log in to your account. 


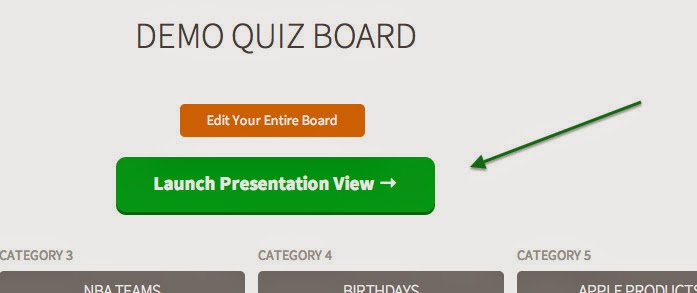
8. Editing a quiz-board is just as easy.  Once you have selected the board from My Boards, just click on the orange Edit Your Entire Board button.  


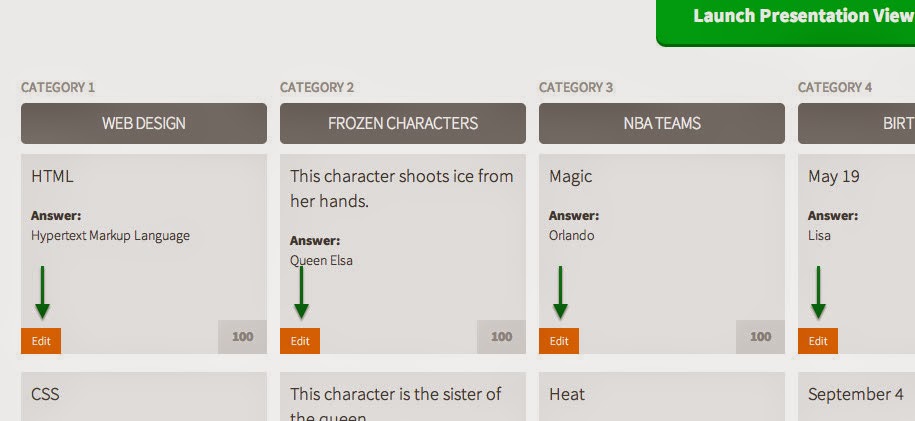
Once the screen (displayed to the right) opens, find the question(s) you need to edit, and then click on that question's orange Edit button.  


9.  To launch your quiz into presentation mode, click on the green Launch Presentation View.  


That's it!!  Happy reviewing!!